ModuTile’s garage floor tiles interlock using a loop-to-peg locking system. It is as simple as aligning the loops to the pegs and pressing down. So why is this article so long? Well, many factors may complicate the installation of your garage floor, such as garage configurations, concrete surfaces, obstacles, or door placement. As an example, choosing the wrong starting point may add many hours to your installation time.
Below, we outlined the seven steps of installing your new interlocking garage floor tiles.
A seven-step process on how to install interlocking garage floor tiles
- Determining the starting point
- How to deal with epoxy concrete surfaces
- Recommendations for garage floors with drains
- Aligning the garage floor tiles and snapping them together
- Starting the garage floor Installation
- Garage Obstacles such as lifts, columns or furniture
- Cutting the Interlocking garage floor tiles
You can skip around this article to each section as needed. Of the seven steps listed above, choosing the correct starting point will save you the most time. Additionally, knowing when it is appropriate to cut the tiles and how to deal with obstacles prevents frustration and wasted product.
Installation Tip: You may consider using a small mallet and a utility knife if cutting is required. For your comfort and safety, we would also recommend knee pads and leather gloves. If using a jig-saw, we also recommend safety glasses.
1. Garage Floor Tile Installation Starting Point
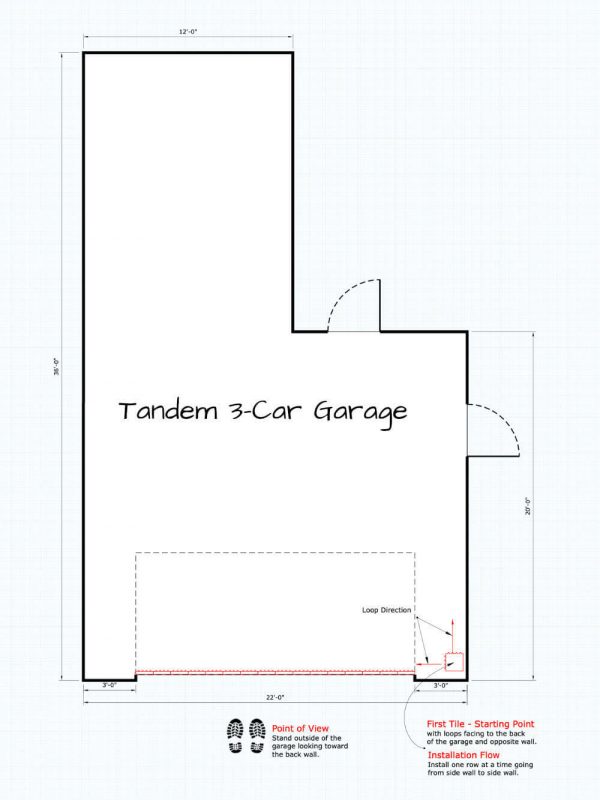
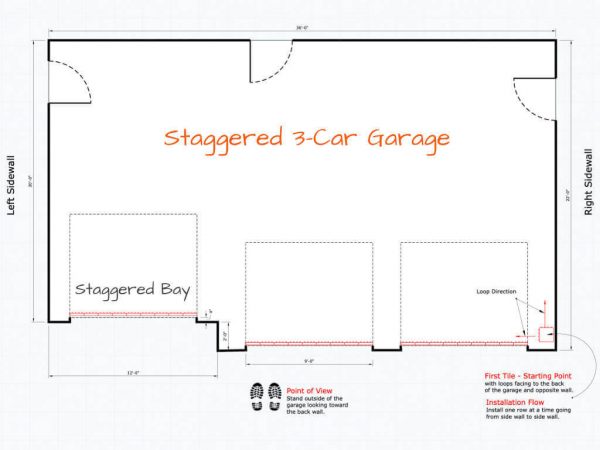
The starting point depends on the layout of your garage. Below, we explain the different garage shapes and the location we would pick as a starting point based on the configuration. We identified three common garage floor shapes.
- Rectangular Garage Floor Plan
- “L” Shape Garage Floor Plan
- Staggered Garage Floor Plan
The basic principle we use for all three configurations is to start at the main vehicle entrance and choose the side with a garage door. If the side of the garage does not contain entries, we tend to begin at the longest side to minimize cutting.
Rectangular Garage Plans: Interlocking Garage Floor Tile Installation Starting Point
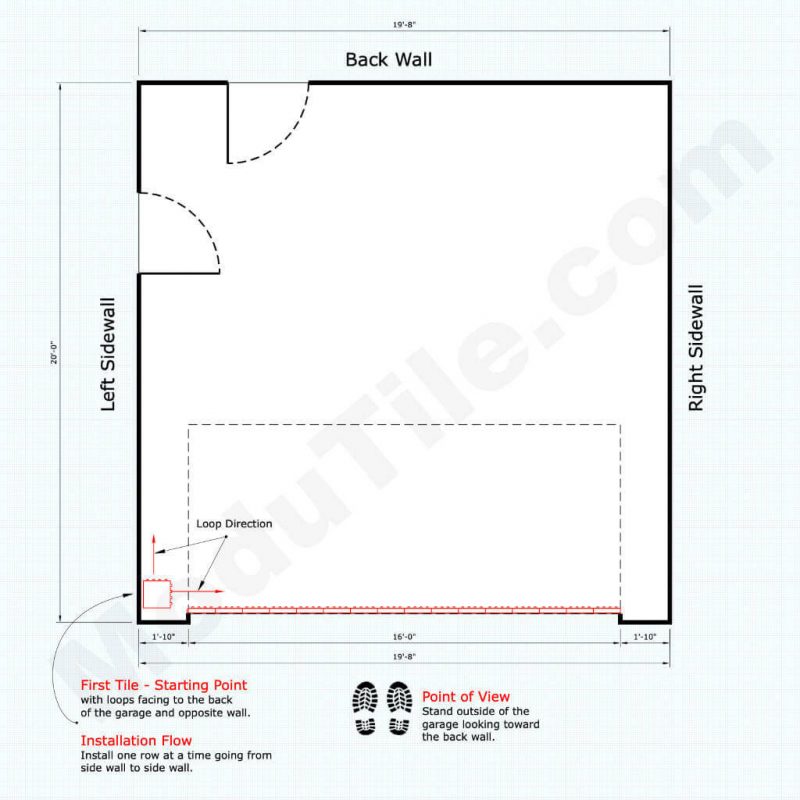
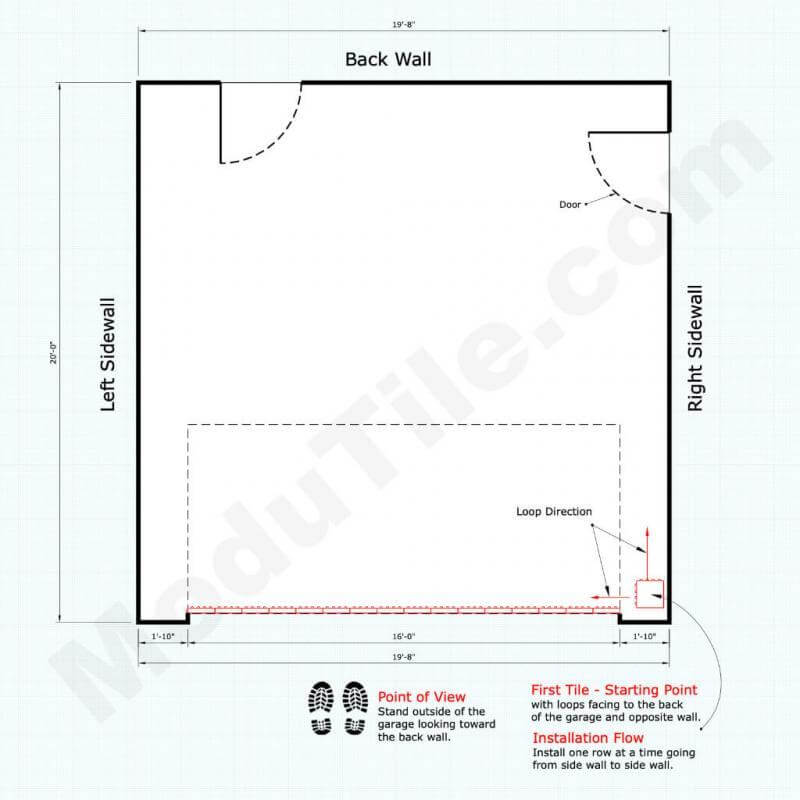
The rectangular-shaped garage is by far the most common garage floor shape. The basic rectangular shaped garages can accommodate 1, 2, 3, or more vehicles. The form is just as described: rectangular. On the images below, we illustrated the optimal starting points.
Please notice that we always choose the garage entrance to align the interlocking garage floor tiles. When there are doors on the side of the garage, we want the side with the door. The simple reason is that we need to control where the garage tiles start. Since a cut tile cannot be interlocked, we leave the cutting for the back of the garage and the farthest side away from any door. This method leaves a clean installation, and the garage floor looks better.
“L” Shape Garage Plans: Interlocking Floor Tile Installation Starting Point
For the “L” shaped garage, we start at the entrance of the garage but on the longest side. This will minimize the cutting required. However, if a door is on the short side, we will pick the side with the door. Again, the reason is that we want to control the alignment of the tiles for the entry points. In most cases, the entrance to the house is on the opposite side of the garage door. Below, please see three common garage floor plans with this configuration.
We always pick the side of the car entrance. Aligning the tiles is much easier at the beginning of the installation. Once you install a few hundred tiles, the floor gets heavier and much harder to align.
Staggered Garage Plans: Interlocking Floor Tile Installation Starting Point
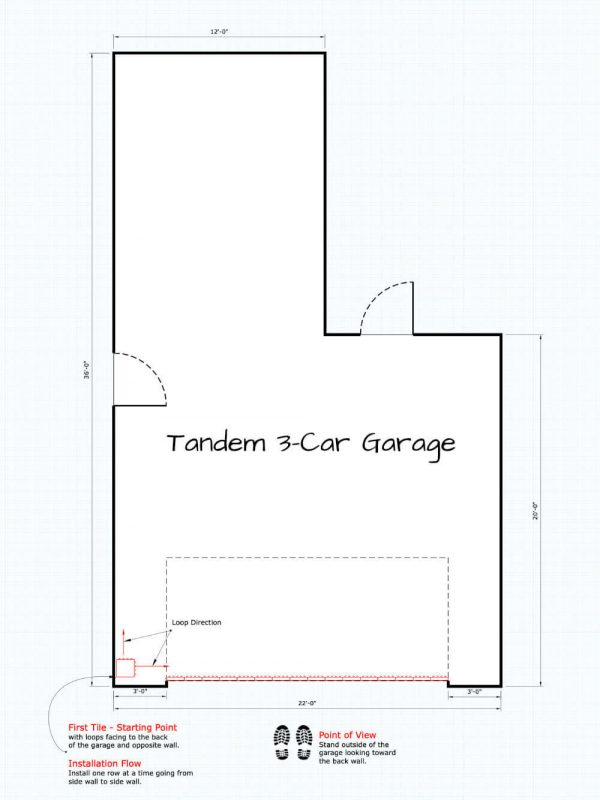
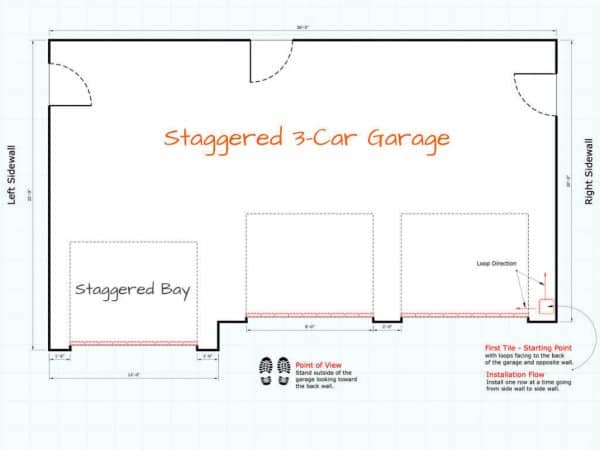
We start the installation on this type of garages on the longest entrance. Most staggered garages are three-car garages. We pick the two-car entrance side as the starting point. As always, we choose the entrance side instead of the back to control the alignment of the tiles where the vehicle enters the garage.
With this type of garage layout, the general rule of thumb for picking a starting point relates to avoiding misalignment at the entrances. The longest entrance is usually the primary entrance. We want to make sure the tiles align perfectly at the opening of the garage.
2. How to deal with epoxy concrete surfaces?
Customers who are unhappy with epoxy floor paint often turn to garage floor tiles. Epoxy paint will tend to peel if it is not installed correctly or if an inappropriate type of epoxy paint is used, especially when the concrete floor is old and stained with oil. There are many varieties of epoxy paint, and they are not all created equally. In a typical installation, it is tough to maintain the bond between the epoxy floor paint and the concrete. The result is the separation of the epoxy paint from the concrete when a large amount of pressure is applied.
Over time, epoxy will look like it is peeling from the concrete. When you install our garage floor tiles over epoxy floor paint, the floor tends to be smooth. This creates less friction between the interlocking garage tiles and the concrete potentially causing the tiles to shift. This can also happen on some polished concrete.
What to do if the garage floor tiles shift
If you experience shifting, you can use rubber underlayment runners or double-sided tape. By doing so, you will create more friction between the smooth epoxy floor underneath and the garage floor tiles. Essentially, this will prevent the tiles from sliding. Note that you do not need to put double-sided tape on every garage floor tile. You can usually add a few strategically placed large Xs on the floor. In most cases, parallel lines running from the back of the garage to the entrance is more appropriate because it will allow the water to flow out of the garage easily. If you have a drain in the garage, make sure the double-sided tape does not create water retaining barriers that would prevent the water from draining correctly.
Some customers choose to resurface the concrete with grinders. However, that is labor intensive, and sometimes still leaves the concrete too smooth.
3. Garage Floors with Drains
If your garage has drainage, it is recommended that you use our perforated drain garage floor tiles on the portion directly above the drain. This will allow any water that enters your garage to drain easier. You can also use our drain tiles for your entire garage flooring. The advantage of using the drain tiles for the entire garage is that the floor will look cleaner. The disadvantage is that when you do clean, it may take longer as you will need to use a shop vacuum and in many cases a power washer. This is a good option for many people leaving in northern states where snow is common.
4. Aligning the garage floor tiles
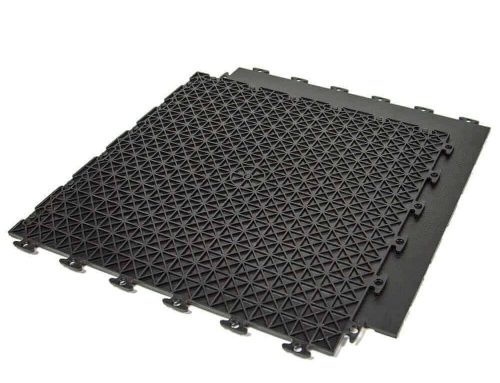
Interlocking the tiles together is as simple as aligning the tiles correctly and snapping them together with your hand or mallet. Aligning the Interlocking Floor Tiles properly in the same direction is essential. Remember that these interlocking tiles are modular, so they can connect even if they are aligned incorrectly. Please see image to review a basic diagram on how to align the tiles. If you notice on the correct tile alignment, the loops are all facing the same direction. Make sure you align the pegs and loops correctly as this will allow them to snap together much easier.
Once you choose your installation starting point, you are ready to start your project. For full garage floor installations, we start at the entrance of the garage. Please read above to determine the best installation starting point. How you align the tiles for the installations depends on the starting point. The simple rule of thumb is to align the tiles with the loops pointing toward the possible walls from your starting point. Since we recommend starting the garage floor installation from the entrance of the garage, you would point the loops toward the back of the garage. The other side of the tiles with loops needs to point toward the opposite wall from your starting point.
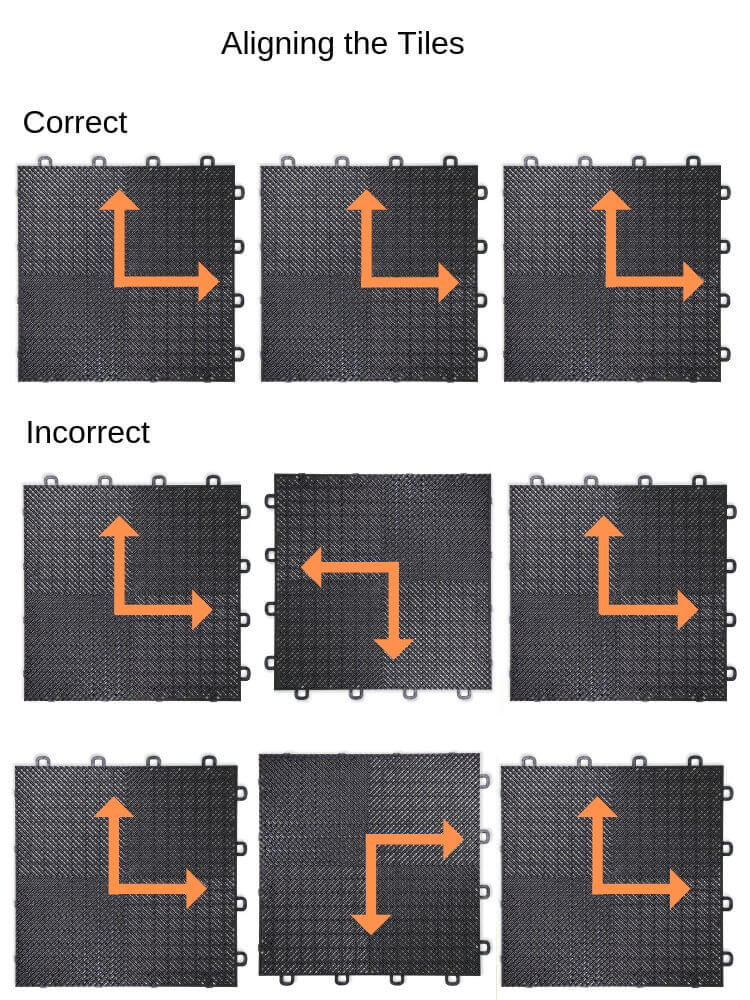
Align the garage floor tiles based on the starting point. Review the starting point diagrams for optimum starting point based on your garage configuration.
Warning: There is a possibility of damaging the pegs and loops if you bang them with a mallet when the loops are not correctly aligned.
5. Starting the garage floor installation
When installing your garage floor, we highly recommend that you install ramp edges at the entrance of the garage. Remember that you will be opening your garage doors, and without the borders, the room will look unfinished. Also, the ramp edges serve as a bridge for your tires to move from the concrete to the garage floor. When the ramp edges are used, your floor will tend to shift much less, reducing the need for future adjustments. We always recommend that all DIY garage floor installers begin the installation from the entrance of the garage. The primary reason is to allow you to easily place the first row at the exact place you want the ramp edges and the garage tiles to be. Remember that the entrance of the garage needs to look the best as it is the first area you will see when entering the garage.
A common question we get goes as follows:
Before we install a single garage tile:
We layout the ramp edges with loops at the entrance side.
When installing my garage floor, why can’t I install the ramp edges last?
The answer is that nothing prevents you from installing the edges last. However, special consideration should be given to what type of ramp edges you choose. We make ramp edges with loops and ramp edges with NO loops (pegs). When you start your installation at the back of the garage, you will end up needing ramp edges with NO loops. Also, when you start your installation from the back of the garage, you may need to shift the entire floor because you cannot cut tiles at the entrance of the garage. If you were to cut the tiles at the door of your garage, you would not be able to use the edges because you would be cutting the tiles’ locking mechanism.
Tips to avoid potential mishaps during your garage floor installation
Because of possible mishaps that can occur when beginning the installation in the back of the garage, we always recommend that our customers start the installation at the entrance of the garage. If you do, you will need to buy the ramp edges with loops. I assure you that for first time installers, this method will be much simpler and is less likely to result in mistakes.
- Install the first interlocking garage floor tile by aligning the loops toward the back of the garage and the opposite wall from where you started. By aligning the tiles this way, you assure yourself that you will snap the tiles down as you go from tile to tile. If you point the tiles a different way, you would have to pick up each tile to interlock the next. Although it is possible, it is more complicated and results in a longer installation process.
- Install one row at a time. Make sure you point all the interlocking garage tiles the same direction.
- When three or four rows are completed, adjust, and realign if necessary. Sometimes the floor tiles shift as you are installing the first few rows.
6. Garage Obstacles such as lifts and furniture
If you plan to have a car lift inside your garage, we recommend that you install the lift first and then the garage floor. This will allow your lift installers to secure the car lift directly to the concrete making the installation much more secure. When you do install the garage floor tiles, you will cut the tiles to fit around the posts.
In many large garages, you will also find posts or columns. When this is the case, you should also cut the garage floor tiles to fit. You can install the entire garage first and cut the garage tiles to fit around the posts at the end of the installation. Don’t cut to fit at this point.
For advanced installers, you can cut during the installation as you reach the obstacle. Since you are installing one row at a time, it would be easier for you to cut the tile and install before continuing to the next row. The disadvantage is that you would not be able to shift the floor as the obstacles would prevent you from doing so.
7. Cutting the Interlocking garage floor tiles
Installing one row at a time, snap all the garage floor tiles possible without cutting. Next, tile around any permanent obstacles. Before cutting the garage tiles, adjust or shift the floor if necessary. It may be beneficial to wait 12 to 24 hours, so the tiles acclimate and expand. After the garage floor is adjusted by either waiting or manually adjusting, it is time to start cutting to fit.
To cut the tiles, we recommend a utility knife or a jig-saw with a fine-tooth blade. Other tools, such as a circular saw can be dangerous. The blades are thick and get hot when cutting high-impact plastic.
Make sure you leave at least a 1/2-inch gap between the tiles and any permanent objects including walls, heavy furniture, or car lifts.
You are done, take pictures and share with us.
