ModuTile Sport Tiles for backyard basketball courts are easy to install over any hard surface. The instructions below are a basic guide that will tell you how to install backyard basketball court tiles. Unless alternate custom packing is requested, ModuTile uses a sequential boxing and sequential sport tile packing methodology. As a result, you will have a specific installation starting point. The sport tiles are modular, but they must be placed in the proper sequence and orientation. Failure to place them in the correct sequence and direction will cause the lines to be misaligned.
- Locating Box #1, Sport Tile #1
- Point of View
- Installation Starting Point
- Aligning the Sport Tiles to the Correct Orientation
- Installation Flow
- Ramp Edging
- Anchoring the Court (optional)
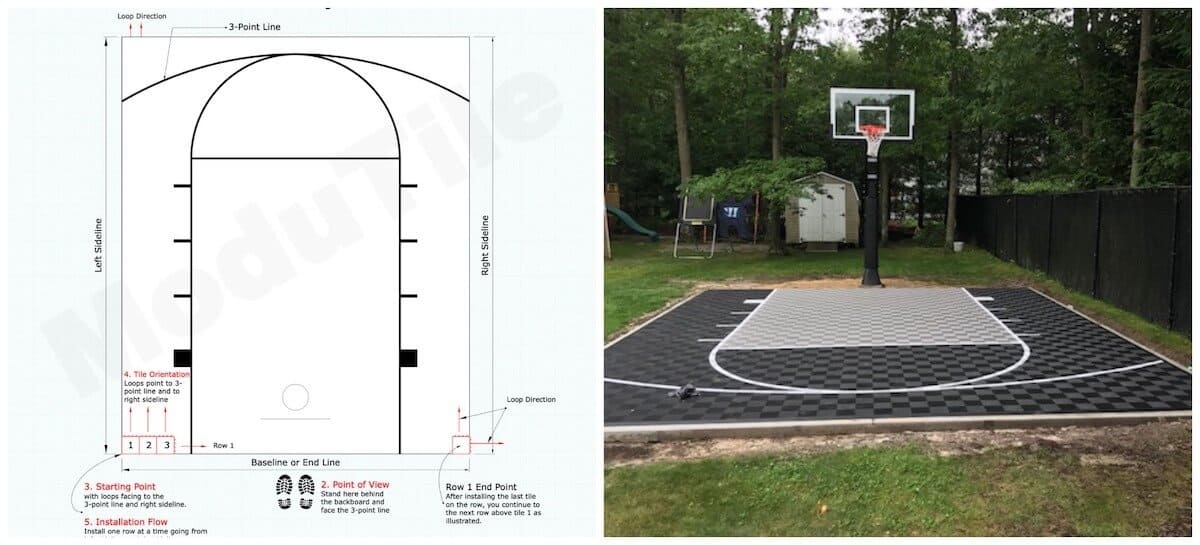
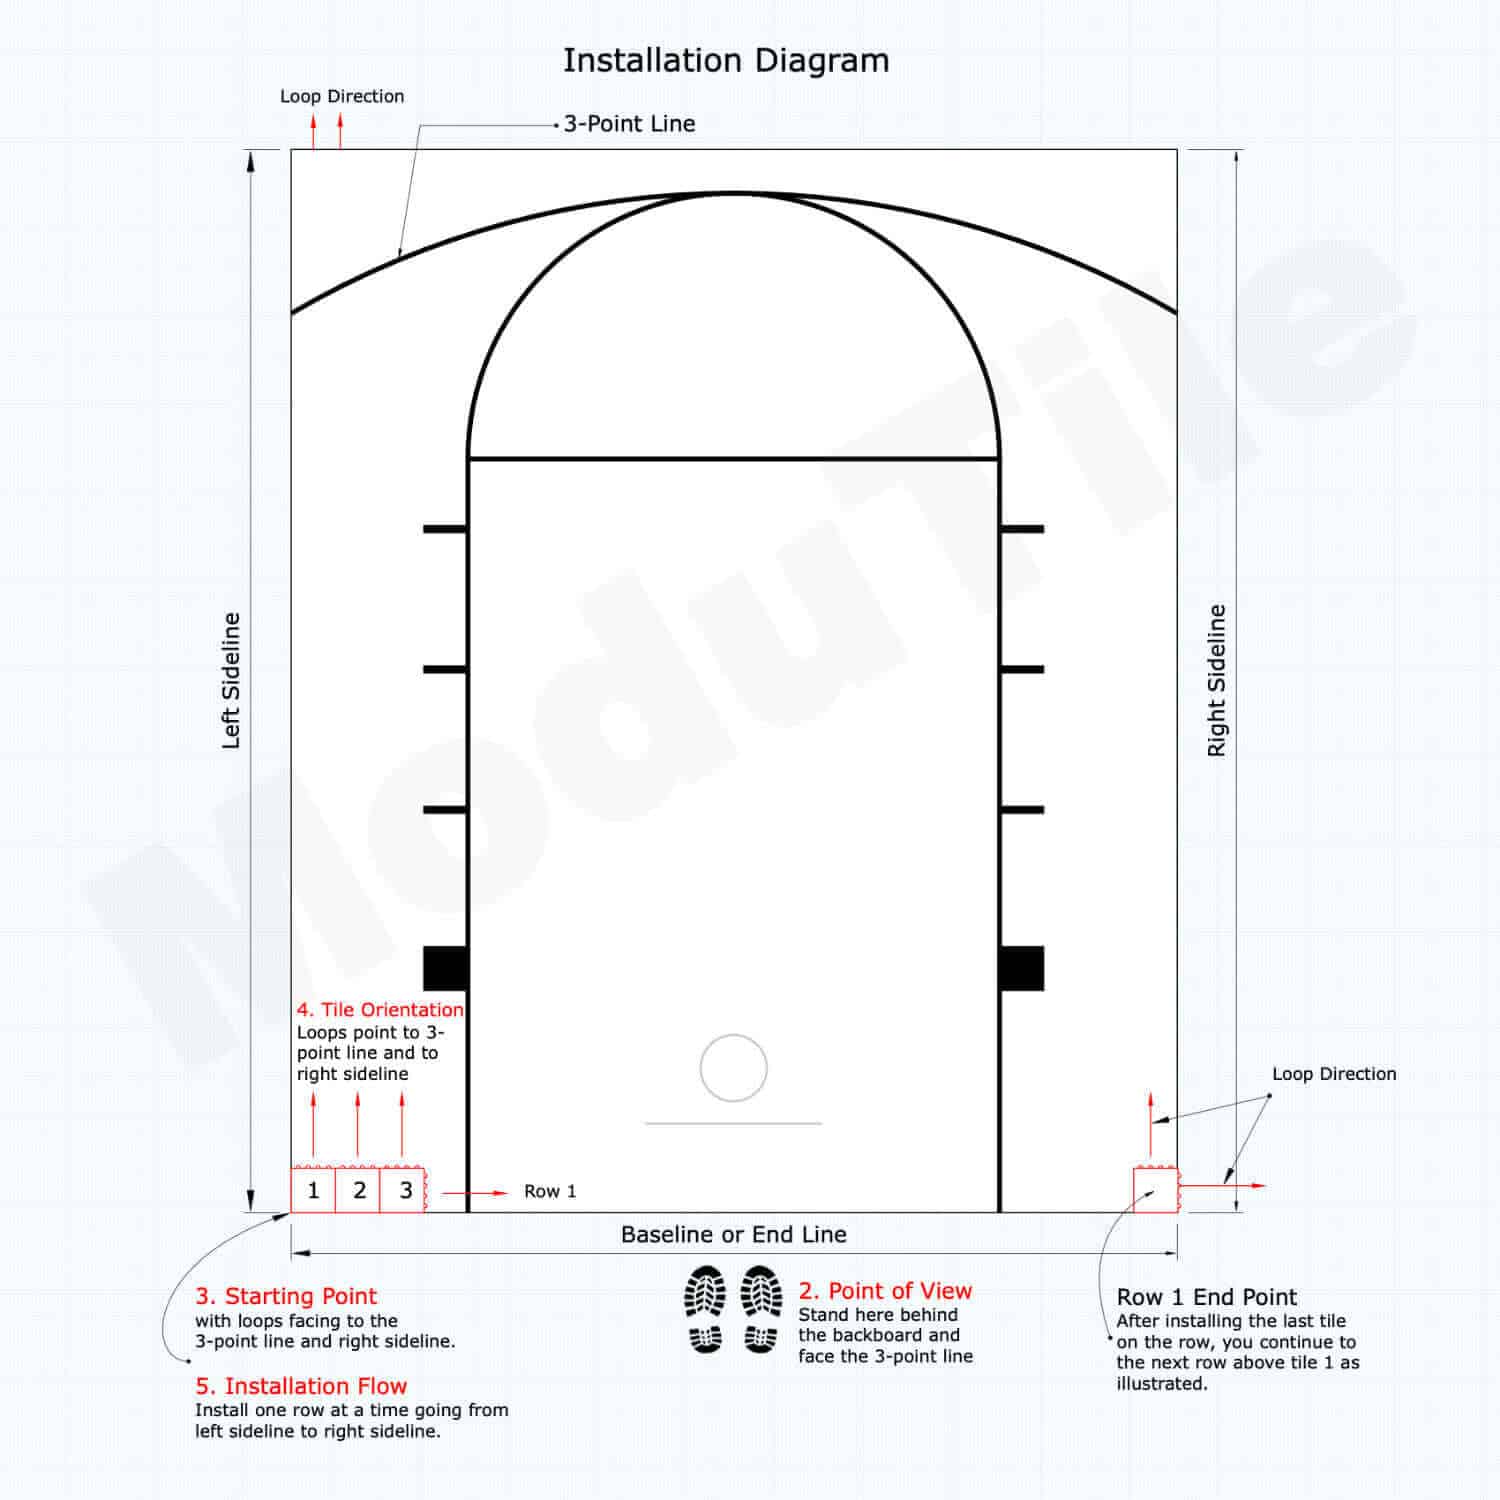
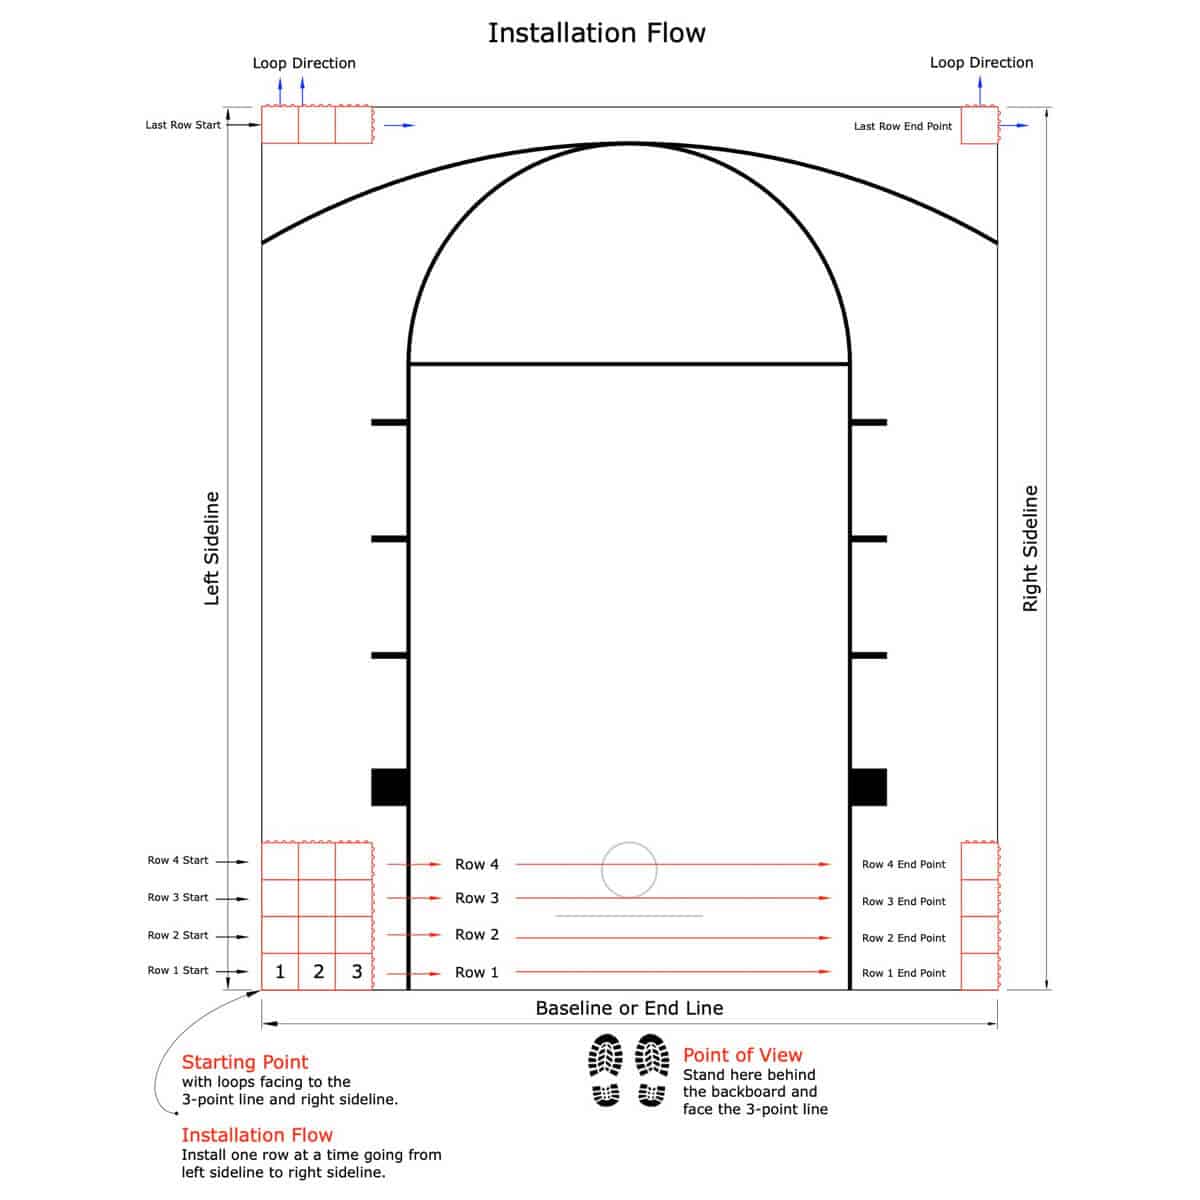
Basketball Court Installation Diagram
Click Image to Enlarge
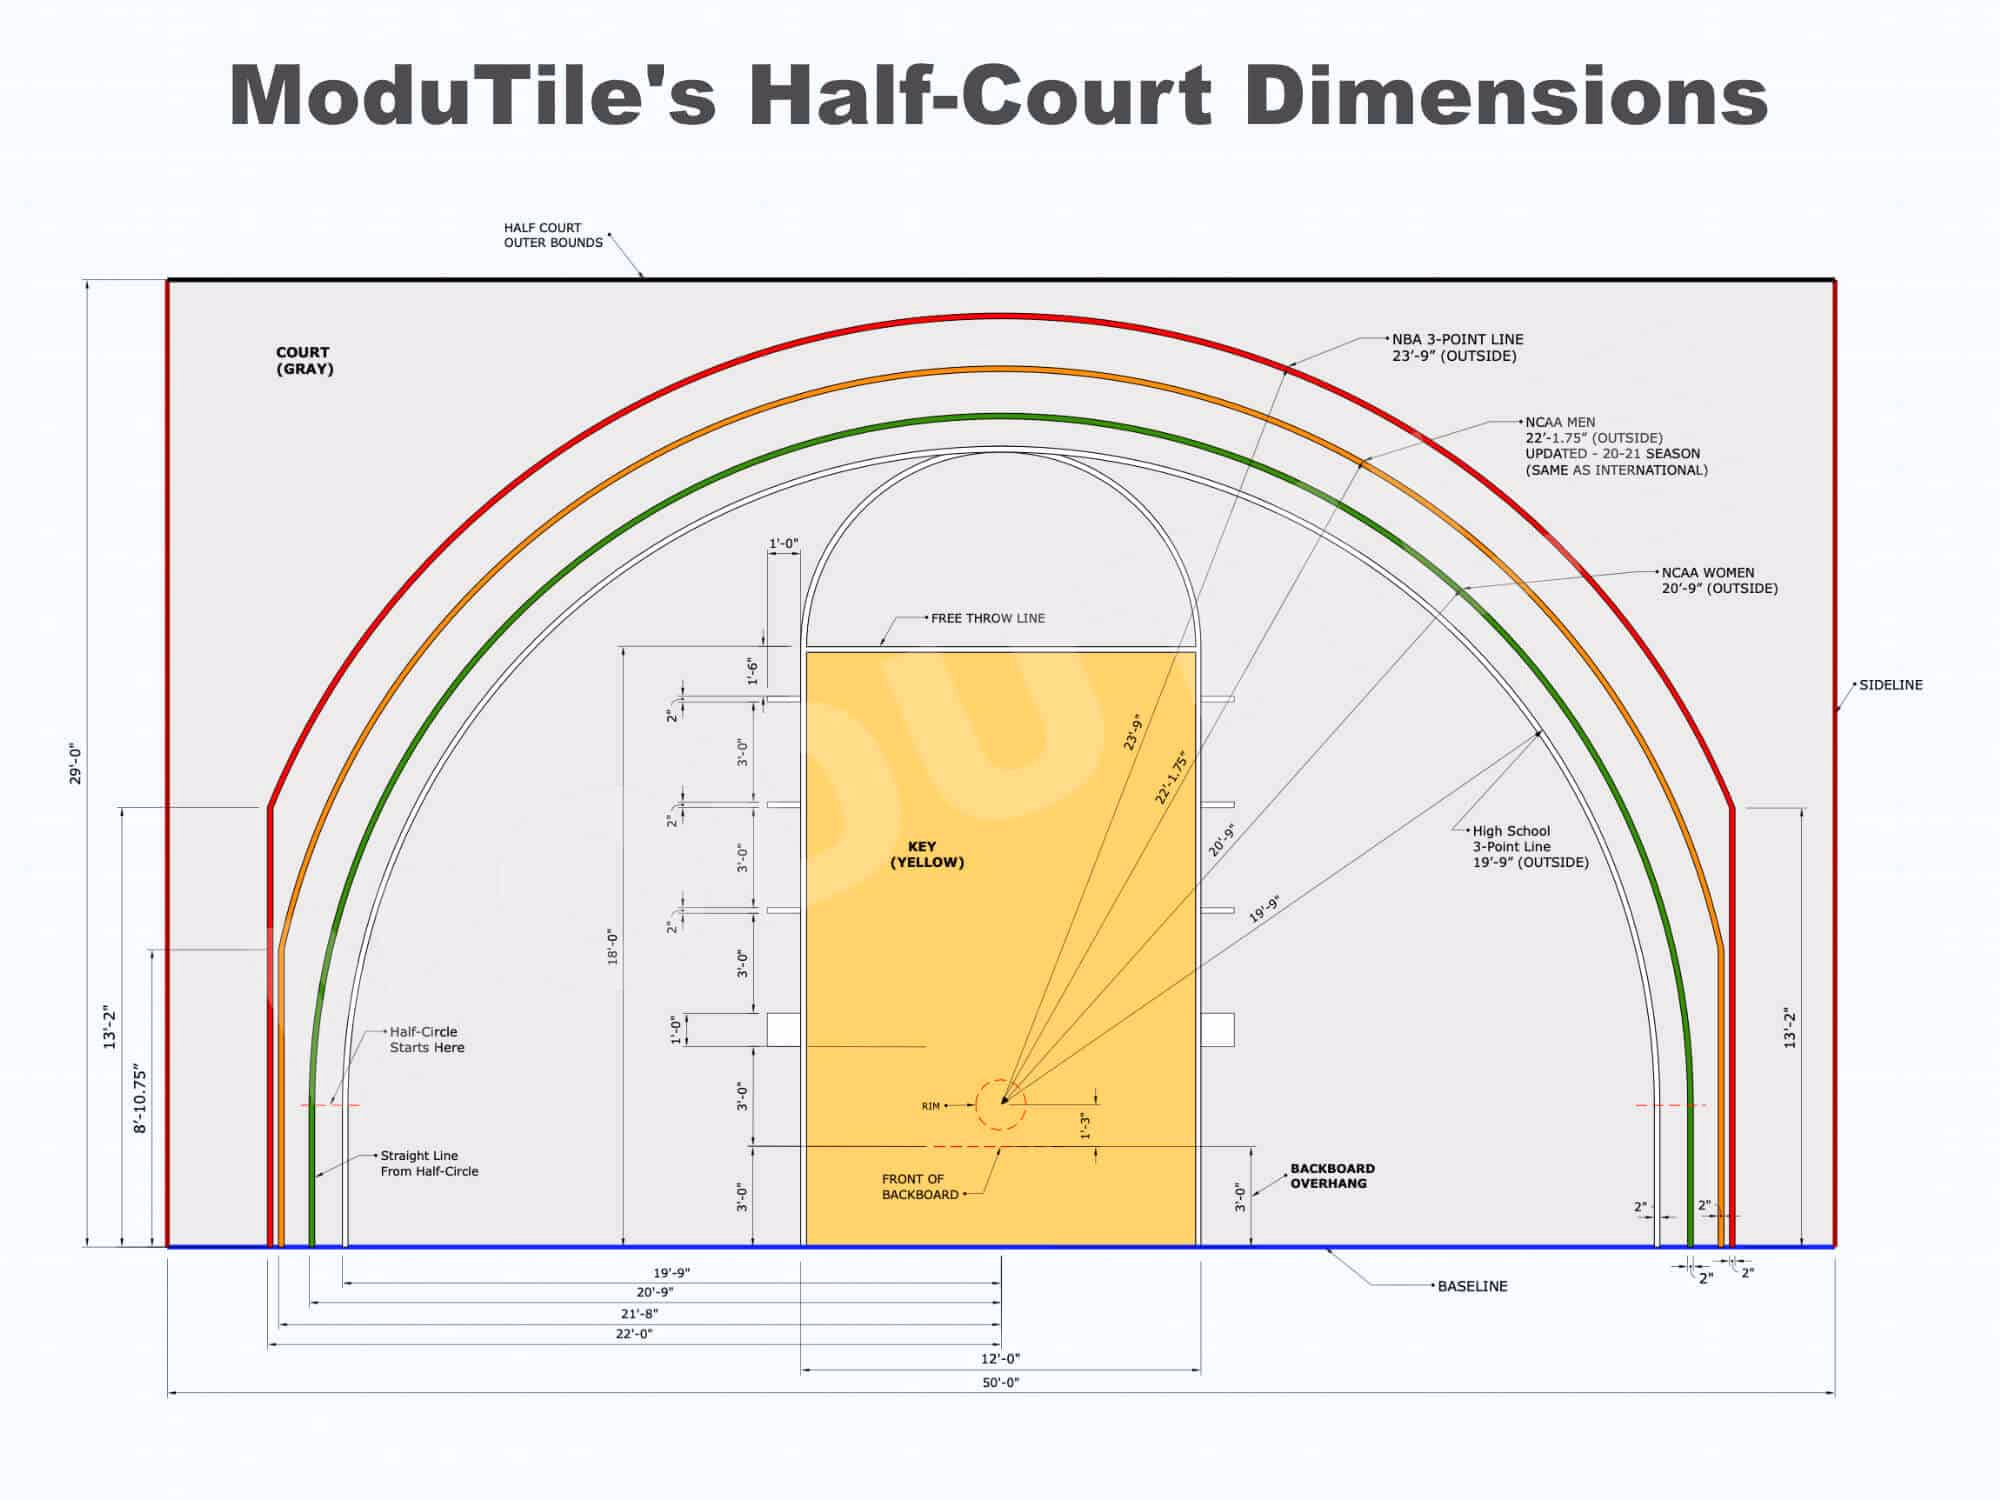
NOTE: This backyard basketball court tile installation guide assumes that you worked out the backboard overhang.
1. Locating Box #1 and Sport Tile #1
ModuTile ships most basketball courts using LTL (Less Than Truck Load) carrier, so the boxes will not get separated during transit. We pack the product in boxes and palletize the boxes. This allows any residential customer to store and move the tiles conveniently since most residential customers do not own a pallet jack or forklift that would be required if we use a 9-stack tile method. However, you can request 9-stack tile packaging after purchase.
We mark all boxes numerically starting with Box #1. When you open the box, you should see tile #1 on top of the box. We label the first sets of tiles so that you can understand the sequence.
Each order will come with a printed installation guide. If you do not receive the installation guide, please contact ModuTile customer support and request it. We will gladly email you a PDF version. Please note that on custom court orders, we may provide additional instructions specific to your order.
2. Point of View
Use this installation guide with the above Installation Diagram. The point of view for assembling the tiles is standing at the baseline behind the backboard and facing the 3-point line. The footprint icon located at the bottom center of the Installation Diagram illustrates the point of view.
3. Installation Starting Point
On standard orders, locate the basketball court installation starting point at the bottom left of the diagram. Therefore, if you are standing behind the backboard facing toward the 3-point line, the starting point would be to your left Baseline (AKA “end line”) corner of the court. If you begin at the wrong starting point, the basketball court lines will be misaligned. The bottom left of the Installation Diagram (number 3) illustrates the installation starting point.

4. Aligning the Sport Tiles to the Correct Orientation
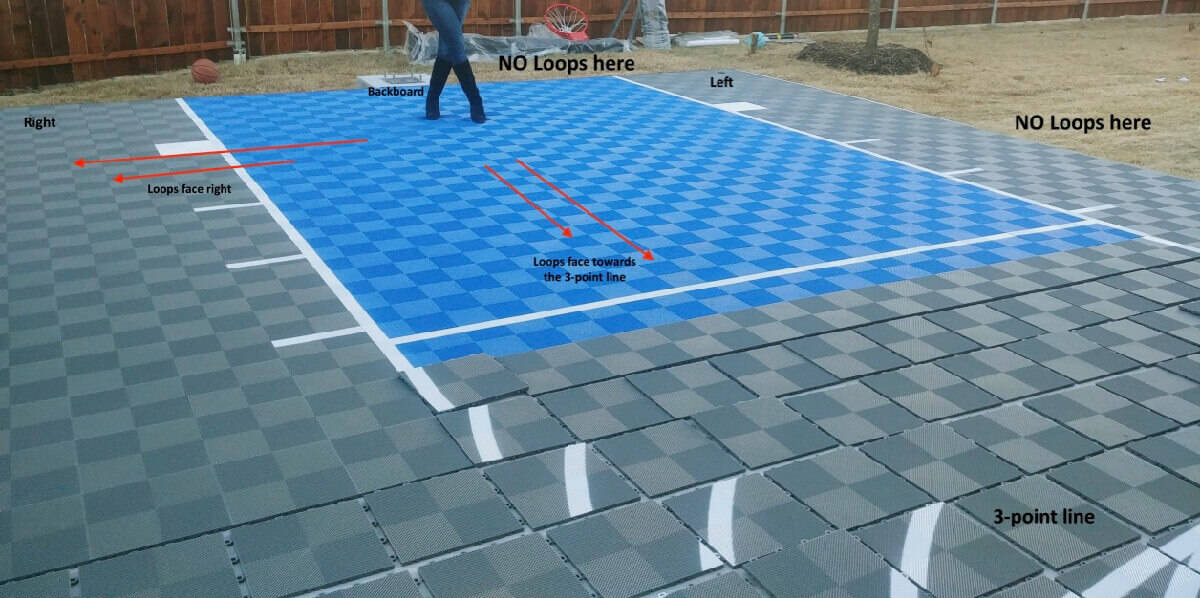
Once you locate the installation starting point, you must make sure that you align the tile loops properly. On our standard packing, the tiles must point the loops toward the 3-point line and the right baseline corner. This assumes you are standing on the far-left corner of the baseline behind the backboard facing toward the 3-point line.
Remember, all our sport tiles are modular, so it is possible for you to assemble the tiles with the loops pointing in the wrong direction, which would cause the basketball court lines to be misaligned. Number 4 on the Installation Guide shows how the loops of the tiles should toward the 3-point line and to the right sideline.
Click Image to Enlarge
That moment when you realize you did not align the loops properly.
5. Basketball Court Installation Flow
We recommend that you install all the sport tiles first and finish with the ramp edging. The tiles are packed in sequence going from one corner of the baseline to the other corner of the baseline. In other words, the installation will flow from sideline to sideline one row at a time as per the diagram.
On the diagram, the flow will be from left to right starting at the bottom left. You will install one row at a time and adjust the basketball court floor as you go. Please make sure you leave about 3″ for the ramp edging. Don’t forget to point the loops toward the 3-point line and the right sideline (while standing behind the backboard looking toward the 3-point line). After installing the first row, continue to the second row in the same manner until the court is complete. Number 5 on the Installation Diagram illustrates how you will assemble the flooring from left to right one row at a time.
On our basic installation instructions, cutting is not required. If your court requires cutting, we recommend that you assemble all the tiles and check for positioning prior to cutting. When installing courts larger than 30 x 30 ft., we recommend that you allow the tiles to expand prior to cutting.
6. Basketball Court Perimeter Ramp Edging
There are two types of edges: with loops and without loops. With the edges, you may start from any end since they do not affect the court.

7. Anchoring the Basketball Court (for smooth concrete floors)
Most basketball court floor tiles do not require anchoring. However, in certain situations, you may wish to anchor the court floor. This is usually the case when the base of the court has smooth concrete. If anchoring is required, we recommend only anchoring along the baseline. For indoor court installations, you may consider using rubber underpayment. This will allow enough traction and prevent the sport tiles from sliding.
Additionally, please note that you should only anchor the sport tiles (not the ramp edging). Depending on the base, you will either need concrete screws or landscape nails. You can use a flat washer on the top. When screwing or nailing the tiles down, make sure you do not press the tile down. You can screw the sport tiles to the concrete while leaving a 1/2″ (more if possible) wiggle room between the tile and the screw. The tile must float below the washer. You should nail or screw the sport tiles approximately every 3 feet along the baseline.
If you have additional questions or comments about “How to Install Backyard Basketball Court Tiles,” please feel free to contact us. You may visit our Backyard Basketball Court page to learn about our court kits. Additionally, we will gladly make a custom size basketball court floor that fits your backyard, driveway or indoor area.
